F-BIT

Tech workarounds I've found useful to document

Proxmark 5 first time setup

The proxmark5 is really an impressive piece of tech but unfortunately you do get kinda thrown in the deep end with it

So, first thing you need to do is get the client set up. Get into the directory you want to put it in, then run

git clone https://github.com/RfidResearchGroup/proxmark3.git
cd proxmark3
make clean

then, EITHER
make -j PLATFORM=PM5
OR
make -j PLATFORM=PM5 PLATFORM_EXTRAS=BWM

then, run
sudo make install

If you have the battery/bluetooth/wifi addon module then use the second command. If you don’t have it, then use the first.

After that’s all compiled and whatnot then it’s time to flash the proxmark5. First flash the bootrom then the firmware image with the following commands:
./pm3-flash-bootrom
./pm3-flash-fullimage

You can also run ./pm3-flash-all which will do both steps, but just in case something goes wrong the first time, it’s advisable to run them separately

After that is done, run “pm3 –list”, it should show you your device

pm3 by itself will launch the client and scan for, then automatically connect to your proxmark5

If you’d like to help with site hosting costs,

Donations in Monero are very appreciated. Please use:

82cGMSGzFAsEYwF237VaJq1PGCRPbWikfJeewDLftsaR5NDwiVLPBgG1YDy7p1UpLBJnnRv84MeHu6Pz3cV7XHZn4N4T35C for XMR

All donations will be used to help host the site

Renaming things on an F5

It’s surprisingly difficult to rename nodes and pools and other objects on the F5 LTM BIG-IP platform. But not if you’re willing to use the CLI and enable a feature left disabled by default.

SSH into your F5, then launch the TMOS shell with the command tmsh

modify /sys db mcpd.mvenabled value true

then use the “mv ltm” command – to see the available options, type in “mv ltm ?”, but it’s all pretty straightforward.

After you’re done, it’s recommended to disable the feature again

modify /sys db mcpd.mvenabled value false

Debian Networking With Vlans

So, here’s a q-in-q subinterface. If you just want the single vlan instead of a vlan stack, just leave the second line out and apply the ip address to eno2.123 instead (your interface names may be different, look at “ip link list” to see them)

ip link add name eno2.123 link eno2 type vlan proto 802.1q id 123
ip link add name eno2.123.456 link eno2.123 type vlan proto 802.1q id 456
ip addr add 10.1.2.3/24 dev eno2.123.456

The New Debian Networking

So now static IP addresses and routes are configured in the dhcp client daemon settings. Makes sense.

Interface settings go in /etc/dhcpcd.conf, and it looks like:

interface eth0
static ip_address=10.0.0.1/24
static routers=10.0.0.254
static domain_name_servers=10.0.0.20

The static routes go in /lib/dhcpcd/dhcpcd-hooks/40-route

It looks like:

ip route add 192.168.100.0/24 via 192.168.0.2

When your inside clients connect to your outside server IP

Because who needs split horizon dns anyway? When you’re using an ASA as your internet gateway, that is.

object network PrimaryServer

host 192.168.1.2

nat (inside,outside) static 2.2.1.2

object network SecondaryServer

host 192.168.1.3

nat (inside,outside) static 2.2.1.3

object network PrimaryServer-ext

host 2.2.1.2

object network SecondaryServer-ext

host 2.2.1.3

nat (inside,inside) source dynamic any interface destination static PrimaryServer-ext PrimaryServer

nat (inside,inside) source dynamic any interface destination static SecondaryServer-ext SecondaryServer

Me

Remove Windows 10 IPv6 Autoconfig address

Windows 10 ipv6 is a huge pain in the ass. Here’s how to actually use the static address you actually configured on the interface for that expressed purpose.

1) Open powershell
2) netsh interface ipv6 set interface “<interface name>” routerdiscovery=disabled store=persistent
3) netsh int ipv6 set privacy disabled
4) netsh interface ipv6 delete address interface=”Ethernet whatever” address=<autogenerated address to remove>
5) netsh interface ipv6 set int <interface number> routerdiscovery=disabled

and “netsh interface ipv6 show addresses” to make sure they haven’t come back.


(set a static address first)

Import pre-existing SSL certificate to Unifi controller (on Debian)

This one was a bit of a pain. I’m assuming that you’ve generated the key, the CSR, sent that off to your CA (or signed it yourself), and received the certificate. You’ve also converted the certificate to DER format if necessary, since you’re familiar with openssl.


Here’s the steps I had to go through to import the certificate and the key:

  1. Break out openssl and convert the certificate to PKCS12 format – openssl pkcs12 -export -in <signed server certificate> -inkey <private key> -CAfile <signing certificate> -out <PKCS12 certificate filename> -passout pass:aircontrolenterprise -caname root -name unifi – the “name” parameter is important as that’ll be used in the keystore. Don’t think you can skip any of these parameters to save time, you’ll just get errors later on. It’s quite finicky.
  2. Back up the keystore – by default it is at /usr/lib/unifi/data/keystore – copy it to keystore.old or something like that.
  3. Import the key from your PKCS12 cert into the keystore (change directory to /usr/lib/unifi/ before running this command) – keytool -importkeystore -srckeystore <PKCS12 certificate filename> -srcstoretype PKCS12 -srcstorepass aircontrolenterprise -destkeystore data/keystore -deststorepass aircontrolenterprise -destkeypass aircontrolenterprise -alias unifi -trustcacerts
  4. Import the certificates you prepared earlier in DER format – java -jar lib/ace.jar import_cert <signed server certificate> <signing certificate>
  5. Grab a beer because you’re all done


Windows Explorer crashing on right-click

So it turns out there’s been a bug in one of the windows updates, which causes Windows Explorer to crash when you right-click in the left hand pane.

I couldn’t find the fix but I did find the tools to figure it out myself. Anyway, here it is.

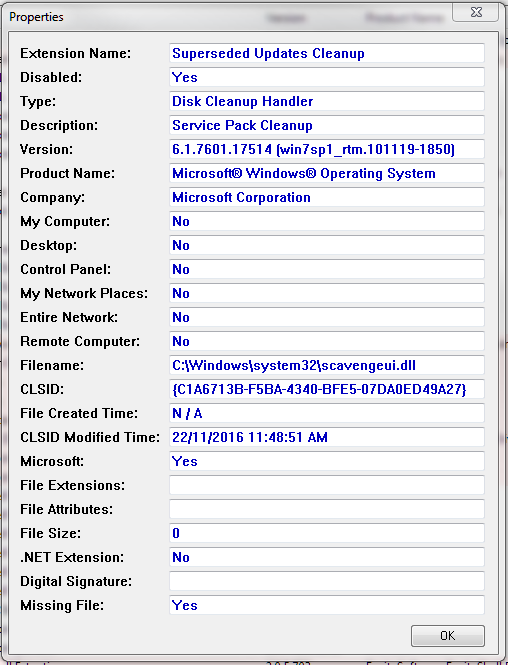
You’ll need ShellExView from http://www.nirsoft.net/utils/shexview.html#DownloadLinks – fire that up, then sort by “CLSID Modified” – it’s probably the most recent one there, but just in case it isn’t, this is the culprit here

cause-of-explorer-crashes

Yep, either a windows update or something left over from one that should have been removed afterwards (but wasn’t).

Importing a preexisting SSL certificate to an ASA

Step 1: Export your certificate as, or convert it to, a pkcs12 format. If you need to do the latter, try:

openssl pkcs12 -export -out <pfx filename> -inkey <private key file> -in <public certificate file> -certfile <CA certificate bundle or intermediate certificate file used to sign your actual certificate>

Then you need to put it in base64 format to paste it in on the ASA CLI – copy/paste the entire next line including parentheses to do it:

( echo -----BEGIN PKCS12-----; openssl base64 -in <pfx file> ; echo -----END PKCS12-----; ) > <base64 file>


Step 2: Create a trustpoint on the ASA and import the certificate:

crypto ca trustpoint <trustpoint name>
enrollment terminal
fqdn <your anyconnect hostname here>
exit
crypto ca import <trustpoint name> pkcs12 <export password>


Page 1 of 2

Powered by WordPress & Theme by Anders Norén